REFERRAL FOR MITRACLIP THERAPY
Your doctors have recommended a mitral valve repair using the MitraClip device to treat your mitral regurgitation. The purpose of this guide is to help you and your family prepare for your procedure at the Hospital.
About Mitral Regurgitation
Mitral regurgitation (MR) is a condition in which the heart’s mitral valve does not close tightly enough.
This lets some of the blood in your heart “regurgitate,” or flow backward, into your heart chambers.
Your heart contains four valves. They are key to the proper flow of blood through the heart. The mitral valve is on the left side of your heart and controls blood flow from the atrium to the ventricle. This valve has two leaflets that open and close to ensure blood travels in only one direction within the heart.
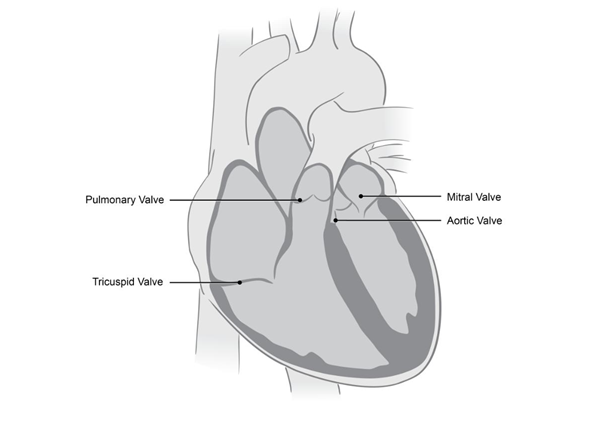
In people with MR, the mitral valve doesn’t seal completely and blood leaks backward. As a result, the heart must work harder to push blood through the body. Common symptoms caused by the increased workload include fatigue, shortness of breath, coughing, an irregular heartbeat and worsening heart failure. MR is a progressive disease that can eventually impact your quality of life and make daily activities more difficult.

Left: Normal - Right: Degenerative MR - Prolapse
Selection Process for MitraClip Therapy
The goal of treatment is to decrease the mitral regurgitation and improve your quality of life. Medications may be prescribed to help reduce the symptoms you experience, but they cannot fix the valve itself.
The current gold standard for treating a severely leaking mitral valve is to perform open heart surgery. The purpose of surgery is to either replace the valve with an artificial one (mitral valve replacement) or repair the existing mitral valve.
In open heart surgery, a heart-lung machine is used to take over the role of your heart while it is being worked on. To repair or replace the mitral valve, the surgeon accesses it in one of two ways. One is through a large incision in the middle of the chest (sternotomy incision).
The other is through a smaller incision in the chest (minimally invasive surgery). In both cases, open heart mitral valve surgery is an effective and-proven way to cure mitral regurgitation, but not all patients are candidates for open heart surgery.
If you are very ill or have many other medical problems, open heart surgery may be considered too high risk. If this is the case, you may be given a referral for a MitraClip procedure. Your eligibility for this procedure will be decided by a specialized team, including a cardiologist experienced in percutaneous (catheter-based) procedures, a cardiac surgeon experienced in valve repair, and a cardiac anesthesiologist experienced in the complex management of patients during these procedures.
Your cardiologist or internist diagnosed you with severe MR after seeing the results of a transthoracic echocardiogram (TTE). This test and your condition triggered a consultation with the MitraClip team. You will need to undergo another test, a transesophageal echocardiogram (TEE), at the Heart Institute to provide the team with the specific measurements of your mitral valve. With this information, the MitraClip team will discuss your case. The purpose of this discussion is to make sure you are getting the right procedure at the right time, along with the best care before and after your procedure.
If you are not accepted for a MitraClip procedure, it means you would not benefit from it. You may be better served by open heart surgery or by having no procedure at all and continuing with your current medical therapy. The next step in your care will be explained to you by one of the physicians on the MitraClip team.
About the MitraClip Procedure
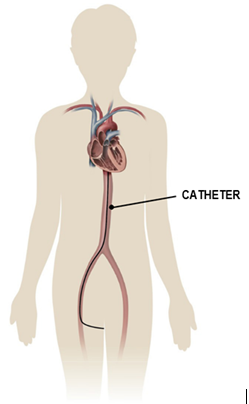
Over the past few years, the MitraClip device has been used in many patients to correct blood flow through the mitral valve without open heart surgery. The MitraClip procedure is performed in a cardiac catheterization lab, not in the cardiac operating room. This procedure is done with a catheter that is inserted through a needle hole (percutaneously, or via the skin) in the groin. The catheter—a long, flexible tube—is inserted into a large vein in your groin (femoral vein) and guided to your heart. It is positioned using ultrasound and X-ray images.
Once the tip of the catheter has reached your heart,your mitral valve is assessed using a transesophageal echocardiogram (TEE). The TEE also aids in the correct placement of the MitraClip. A tool on the tip of the catheter makes a tiny hole through the upper chambers (atria) of the heart so that the catheter can be inserted and guided to the left side, where the mitral valve is located.
Through the catheter, the MitraClip is then inserted and positioned by ultrasound to the leaking portions of the valve. The clip is attached to the mitral valve leaflets, fastening them firmly together and allowing the valve to close better. It is not uncommon for two MitraClips to be used to fix an extremely leaky valve. You will be given general anesthetic so that you will be asleep during the entire procedure.

Left: MitraClip Device Attached to Catheter - Right: MitraClip Closing the Valve
The advantage of this procedure is that it is less invasive than open heart surgery and may reduce the recovery time. The small puncture in your groin, where the catheter is inserted, heals quickly. This is a reasonable alternative to medical treatment (medications) for patients who are not candidates for open heart surgery (such as the very old and frail, patients with very weak hearts and those who have other non-cardiac conditions involving the lungs, kidneys or brain). Patients who have had previous open heart surgery are also considered for the MitraClip procedure because they may be at higher risk for a re-operation.
On the other hand, the MitraClip procedure is still being studied and evaluated for its long- term effectiveness. Not everyone is a candidate for the MitraClip device. It is used only in a limited group of patients with a certain anatomy and type of leakage. The majority of patients with leaky mitral valves should be treated with traditional surgical methods.
PREPARING FOR YOUR MITRACLIP PROCEDURE
Preparing for Your Stay at the Hospital
Expect to stay at the Hospital for about one to seven days after your procedure. The majority of patients are ready to go home in two days.
You are generally admitted two days prior to the procedure to allow for all members of the MitraClip team to meet with you. A few pre-procedure tests can be completed at this time, and you will be seen by an anesthesiologist.
When you are admitted, you may bring some personal belongings with you onto the nursing ward. However, while you are recovering in the Coronary Care Unit (CCU), your family or a close friend will have to take your belongings home. Once you return to the nursing ward, your belongings can be brought back for the remainder of your stay.
Do not, at any time, bring valuables with you.
Please pack lightly and bring only the essentials, such as a hairbrush, a toothbrush and toothpaste, eyeglasses, dentures, slippers and reading material. There is limited storage space at the hospital.
Please designate a contact person (a family member or close friend). We have a system for keeping your contact person informed about your progress.
Be sure to tell us about any allergies you have. As well, make sure you bring the following items with you to the Hospital:
• Your health card
• All of your current medications, in their original pharmacy containers or blister packs
WHAT TO EXPECT DURING YOUR STAY
Before Your Procedure
The evening before the procedure, you will need to take a shower using antiseptic soap (the soap will be provided). From midnight on, you must not eat or drink anything.
The doctor will decide what medications you may take the morning of your procedure.
The nurse will shave a small area on both sides of your groin, and you will take another shower using the special soap.
Before you are taken to the cardiac catheterization laboratory, the nurse may give you some medication with a sip of water if ordered by the doctor. The medication may relax you and make you sleepy.
During the MitraClip Procedure
Your procedure will take about three hours (sometimes a little longer). You will receive general anesthetic so that you will sleep during the procedure and feel no pain.
After you are asleep, the anesthesiologist will put a breathing tube in your mouth. The tube is connected to a breathing machine. Usually the breathing tube is removed before you are fully awake. If you still need support with your breathing, the breathing tube will not be removed until after you are in the Coronary Care Unit.
All other equipment, such as intravenous lines, a heart monitor and a tube to drain your bladder, will be put in after you are asleep.
Once your MitraClip procedure is completed, you will be transferred to the CCU. The doctor will contact your family to let them know your status.
The doctor can either talk to your family in person or call a designated family member or friend on the telephone.
If you would like the doctor to call a specific family member, the staff will ask you for the name and phone number at which your family member can be reached.
The staff will ensure those arrangements are made with you and your family before your procedure begins.
In the Coronary Care Unit (CCU)
WHILE YOU ARE IN THE CCU
Most patients arrive in the CCU breathing on their own. If a breathing tube is still needed, it will be taken out as soon as you are awake and able to follow directions. There will be a nurse with you at all times until you are awake and breathing on your own.
For the first two to four hours after your procedure, expect the nurse to be constantly reminding you to keep both legs straight. This is very important to prevent bleeding from the insertion sites in your groin, where there may still be some intravenous lines.
You will stay in the CCU overnight or longer, if necessary. Your nurse will check with you regularly to make sure you are comfortable. Let the nurse know if you have any pain.
Depending on your progress, you will gradually start to increase your activity, beginning with sitting up in bed, then sitting in a chair, and then getting up and walking as tolerated with assistance.
Overnight, you will be allowed clear fluids as tolerated. You should be able to resume your normal diet the next day.
Most of the specialized monitoring equipment will be removed by the morning after the procedure. Once you are in stable condition, you will be ready to leave the CCU. You will be transferred to a nursing unit on the fourth or fifth floor. In most cases, this is the day after the procedure.
The day after the procedure, you will undergo a repeat transthoracic echocardiogram to assess the function of the MitraClip device. You will also have blood tests, a chest X-ray and an electrocardiogram (ECG).
A nurse will check your insertion site for any problems and teach you what to look for as you heal. In the morning, a stitch will be removed from the insertion sites in your groin. A small bruise or a small, soft lump where the line was placed for the procedure is normal. It is also normal to experience bruising at the site, which sometimes spreads down your leg.
Notify your nurse or doctor if you have any of the following problems with the insertion site:
• An expanding lump or a persistent area of redness and warmth
• Yellow drainage from the insertion site
• Worsening numbness in your leg
• Severe discomfort at the insertion site
Managing at Home
You and your family must start planning for your return home before your admission to the hospital.
For most people who undergo this procedure, it takes up to a week to recover.
Most patients return home after two days in the hospital.
Physical Activity
You should not lift, push or pull anything that weighs more than 10 pounds for the first five days after discharge. Even though you may feel ready to resume your normal activity, we recommend you take it easy for at least one month after discharge. If you need to climb stairs, try to limit this to a couple of trips a day for the first week. When you are stronger, you may go up and down stairs as desired.
Continue with any physical activity plan you may have started in the hospital.
Why Your Physical Activity Plan Is So Important
After your MitraClip procedure, your physical activity program is designed to help you recover and get your energy back.
Exercise helps you:
• Feel less tired
• Feel less short of breath
• Sleep better
• Gain more energy to do what you love
• Improve your mood
• Have less difficulty with daily activities
• Feel more confident and in control
Learn to Balance Your Activity with Rest
Give yourself time to get back to normal. Most patients say it takes about a month to feel fully recovered. Use the tips below to save your energy and help your recovery:
• Prioritize: Decide which tasks you really need to do yourself and which tasks you can ask someone else to do.
• Plan: Do the things that use up your energy when you are feeling your best. Make sure you build in rest or relaxation periods during the day.
• Pace: Break down hard jobs into smaller tasks and take regular breaks before you become tired.
• Position: If you sit to perform a task, you will use 25% less energy than if you stand. Avoid unnecessary bending or overhead reaching.
PRACTICAL TIPS
• Organize your time so that you take fewer trips up and down stairs.
• Double the recipe when you cook, and freeze some for another day.
• Use lightweight pots and pans for cooking.
• Consider equipment such as a shower chair, long-handled reacher or grabber, and long-handled shoe horn.
• Get extra rest the day before a celebration.
• Get extra rest during times of emotional stress or illness.
• Use a weekly schedule.
Exercise should be fun, easy to do and part of your everyday life. Walking is one of the best exercises for improving your health after a MitraClip procedure.
Plan to walk every day. Have someone walk with you for the first couple of weeks. You should be able to carry on light conversation while you walk. If you are too short of breath, slow your pace or take a brief rest.
Begin with short periods at a slow pace, such as two to five minutes, once a day. Continue for about two weeks, and if it feels comfortable, gradually increase the length of time you walk for another two weeks. Continue until you reach your goal.

Your goal is to work up to 20 to 30 minutes of walking every day.
If you can’t walk five minutes without stopping, try interval training:
• Walk for two to five minutes and then rest for two to five minutes.
• Repeat as many times as you are able.
• Gradually decrease the resting time between intervals.
While you are exercising:
• You should be able to carry on light conversation.
• Start with a warm-up and end with a cool-down (for example, slower walking, seated or standing exercises).
• Walk on flat ground (avoid hills).
• Wait at least one hour after a meal before exercising.
• Exercise at a time of day when you feel rested— generally morning rather than afternoon.
• Avoid extreme heat or cold. You might consider walking indoors at a mall, using a treadmill (with no incline) or a stationary bicycle (with little or no tension).
• Avoid heavy lifting or pushing.
• Avoid activities that involve lifting weight above your head.
• Avoid exercises that make you strain, grunt or hold your breath.
• You should be breathing like you normally do in your resting state within 10 minutes of completing your exercise. If not, reduce the length or intensity of exercise the next time.
WHEN TO STOP AN ACTIVITY
Always listen to your body.
Stop the activity if you:
• Cannot carry on a conversation without being short of breath
• Feel weak or dizzy
• Feel sick to your stomach (nauseated)
• Feel your heart is pounding or racing
• Have any discomfort
Stop and rest. Sit in a comfortable chair.
If these symptoms persist, call 1-1-2.
Deep Breathing
Place hands on stomach and take a
deep breath. Feel hands move out.
Exhale fully and feel hands move in.
Repeat times.

Knee Raises
Raise one knee up toward your chest and then lower it to the starting position. Repeat with other knee. Keep alternating right and left.
Repeat times.

Ankle Pumps
Push down on your toes as you lift your heels off the floor as far as you can. Then return your feet to the starting position and lift your toes off the floor.
Repeat times

Knee Extension
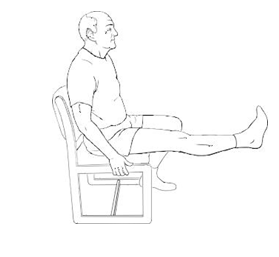
Sit with your back straight and hands in your lap or at your sides. Slowly straighten one knee. Hold for three seconds and then lower it to the starting position.
Repeat times with each leg.
Place hands on stomach and take a deep breath. Feel hands move out. Exhale fully and feel hands move in.
Repeat times.
With feet flat, turn upper body as far as possible toward one side. Hold for three seconds. Return to starting position.
Repeat times each side.
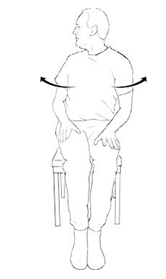
Shoulder Flexion
Lift one arm straight up and over your head as far as possible while you inhale. Return arm to your side as you exhale.
Repeat times each arm.

Tips to Stay Active
• Include a variety of activities that you enjoy.
• Any amount of activity is better than none at all.
• Stick with it until it becomes a habit.
• Wear comfortable clothing and shoes.
• Invite a friend to join you for a walk.
• Schedule exercise into your day.
• Set reasonable goals for yourself.
• Keep an exercise journal to track your progress.
Examine the insertion site in your groin every day. It is normal for it to feel like a small dime or pea-sized lump that may be slightly red and tender and, occasionally, to have some clear drainage.
Call your doctor or the nursing coordinator immediately if you notice:
• A lump that is getting bigger
• Any area of redness or warmth
• Any kind of yellow or pink drainage or poorly healing incision
• Unusual pain in the groin region and/or radiating down the leg or felt in your lower back
Pain or Discomfort: Expect the discomfort in your groin to gradually decrease as you continue to heal. If you begin to have more pain or any chest pain or breathlessness, contact your doctor or the nursing coordinator.
Other Symptoms: Call your doctor or the nursing coordinator if you develop a fever or flu-like symptoms, such as feeling unusually tired.
CALL 1-1-2 OR GO TO THE NEAREST EMERGENCY DEPARTMENT IF YOU EXPERIENCE:
• Increasing shortness of breath
• Irregular heart rate
• Numbness or weakness in your arms or legs
• Blurred vision
Daily Weight Checks
While you are recovering in the hospital, your weight will be checked daily. A sudden weight gain might be an early sign that you are retaining extra fluid. When you go home, you need to continue to weigh yourself daily for the first month to make sure you are not building up extra fluid.
Before you are discharged, you will be given a daily weight tracking form for recording your weight.
The nurse will review with you how to weigh yourself each day and when you need to call us.
When you are discharged from the Hospital, expect to have new prescriptions written for you.
Some of the medications will be the same as the ones you were taking before, and some will be different.
Before you go home, it is important that you and your family understand your prescriptions and how to take each medication. If you have any questions, make sure you ask your nurse before you leave the hospital. Please contact your doctor or the nursing coordinator if you have questions when you return home.
You may need to take anti-platelet medication. These medications make your blood less sticky and help prevent clots from forming on your new valve device. If you have a history of an irregular heartbeat (atrial fibrillation), your medication may be changed to a different type of blood thinner that is more effective for patients with a valve device.
|
NAME OF ANTI- |
ACTION |
POTENTIAL SIDE |
|||
|
PLATELET MEDICATION |
EFFECTS |
||||
|
|
|
||||
|
|
|
|
|
|
|
|
ASA (Aspirin®) |
• |
Helps prevent blood |
• |
Increased risk of |
|
|
Clopidogrel (Plavix®) |
|
clots on MitraClip device |
|
bleeding and bruising |
|
|
• Decreases risk of future |
• |
Stomach upset |
|||
|
Warfarin (Coumadin®) |
|||||
|
|
heart attacks |
|
(nausea, diarrhea, |
||
|
|
• |
Helps prevent stroke |
|
heartburn) |
|
|
|
|
|
|||
|
|
|
in patients with an |
|
|
|
|
|
|
irregular heartbeat |
|
|
|
|
|
|
|
|
|
|
LIVING WITH YOUR MITRACLIP DEVICE
Maintaining a Heart Healthy, Low-Salt Diet
Too much salt in your diet can cause fluid to build up, forcing your heart to work harder.
Following a low-salt diet will help your heart work more efficiently and place less stress on your heart valve. It may even keep you out of the hospital.
The following tips can help you lower your salt intake and keep your diet heart healthy:
• Read food labels: Choose foods in which the sodium (salt) content is 8 % or less per serving.
• Reduce salt during cooking and avoid adding salt at the table:
• Replace salt with fresh or dried herbs, lemon juice, flavoured vinegars and unsalted spices.
• Rinse canned vegetables before using them in cooking
• Prepare meals using fresh ingredients:
• Use fresh or frozen foods whenever possible
• Aim for a variety of foods from each food group every day
• Use canola or olive oils instead of hydrogenated or trans fats
• Get plenty of fibre, with whole grains and unsalted nuts and seeds
Preventing Other Infections
Your skin is a barrier against infection. Protect your skin by avoiding any new body piercing or tattooing. Pay careful attention to any breaks or cuts in your skin.
Contact your doctor immediately if you develop:
• A fever
• An abscess or boil
• A cut that has become swollen or tender or drains pus
• Any other suspected infections, including urinary tract infections
Notify your doctor if you experience increased shortness of breath or swelling of your ankles or feet.
You will be given an appointment to see either your cardiologist or your cardiac surgeon about one month after your MitraClip procedure. You will have another echocardiogram on the day of that appointment.
We will arrange another echocardiogram at six months and one year post-procedure. You may be seen in the clinic at this time as well. Every yearly anniversary of your procedure date, we will conduct follow-up evaluations of your MitraClip device with further echocardiogram screenings.